Thursday, February 28, 2013

How to make a T-Shirt using a Paper Stencil


Tools/Supplies:

-         T-shirt
-         Paper
-         Pencil/Pen
-         Scissors
-         Fabric paint


Time Commitment:

 ~ 1/2 – 1 hour (plus paint drying time as specified by the manufacturer)


I love the look of screen-printed shirts, but usually I only want to make a few copies of a design (and screens get expensive), so I use paper stencils instead. Note that you can use a stencil brush to paint the design instead of your finger, which will give a different effect. Using your finger gives it a rough, dappled effect that I like.

How to Make it Happen:


Step 1 - The Design

1) First, draw your design. Don’t worry too much about having lots of unnecessary lines in your sketch- the only thing that matters is when you actually cut it out.

Step 2 - The important part

2) Next, cut out your design with scissors (or a razor blade if you have lots of tiny details). This is when precision matters, so take your time. If you have rips in your paper, tape them up or you’ll have phantom lines where you don’t want them.

When you’re done cutting, tape your design to the shirt. Tape the sides of the paper and underneath, near the design itself. Keep the shirt taut under the stencil, which will help keep the design from bleeding past the lines.

Step 3 - Finger painting (stencil style)

3) Dab the fabric paint onto the design with your finger or a stencil brush. Keep the motion as vertical as you can- any movement side to side will shift the stencil or the shirt, which can mess up the pattern.


Step 4 - The Payoff
                                                                            

4) Let the paint dry, then remove the stencil from the shirt. Your custom design is done!


Learn from my mistakes- take your time
  
My design, which is my spoonflower shop logo – I was rushing, so you can see a few spots where the lines aren’t entirely crisp. When the shirt is washed, the design will have a vintage t-shirt vibe.


[xπ]

Sunday, February 24, 2013

T-shirt Tutorial delayed due to moving

I was going to post a T-shirt tutorial, but my week got taken up with moving...

So here's a picture of a t-shirt I made adoring my pile of moving boxes...the tutorial will be later this week...


[xπ]

Thursday, February 21, 2013

How to Reupholster a Wing Chair


*I was saving this one for later, but decided to enter Creating with the Stars, so.... bonus update!

Tools/Supplies:

-         Wing chair with unfortunate fabric choices
-         Approx. 5-6 yards of fabric to recover chair (may want to get 7 yards if using a pattern that needs matching)
-         Piping (if needed)
-         Fabric to cover piping
-         Lightweight cotton padding (used to cover the stuffing on the chair)
-         Staple gun
-         Staples to fit gun (not the kind on your desk- this calls for hardcore staple artillery)
-         Scissors
-         Strong thread (the kind sold for attaching buttons works great)
-         Curved needle (your best upholstery friend)
-         Pliers (to remove stubborn staples)
-         Hammer (to ‘encourage’ stubborn staples to lay flat)
-         Lightweight fabric backing (to use on bottom of chair as a dust barrier)
-         Masking tape to hold fabric in place for stitching & sizing pieces
-         Sewing machine (technically this can be done without it…but I don’t have that kind of time)
-         Optional: Sandpaper (if painting show wood)
-         Optional: Paint/Stain (if painting show wood)


Time Commitment:

 ~30-40 hours, depending on how many things go wrong… this took me a few weeks working off and on

CAUTION: If this is your first upholstery project, you will be in for a LOT of work. I love working in upholstery, but this is not a weekend project!

How to Make it Happen:


Step 1 - Examine patient

1) This is the poor chair before upholstery surgery. If you can find a chair with just cosmetic issues, the process is far simpler. In this case, the padding was pretty good and the frame was stable. That doesn’t mean that you shouldn’t take on a chair with issues, but structural and padding issues can exponentially change the cost of the project.

Step 2 - Remove old fabric (be patient- this will take a while)

2) Remove all the old fabric, keeping track of the order of pieces coming off- they will be replaced in opposite order. Usually replacing fabric will go in this order: under-cushion section & front bottom, back & arms, sides, back, and replacing the dust barrier under the chair last. The cushion can be done at any time. Pliers come in handy for removing stubborn staples, and using them to lever out the staples works best. For really stubborn staples, just leave them there and cut out the fabric around them.

Note: The only fabric I keep is the under-cushion section and cushion pieces. These I make my pattern pieces from. All the rest I do by fitting the fabric into place and then cutting, but you can also use all the pieces to make a pattern if you wish.

Step 3 - Removing dated details

3) This chair had a wooden piece screwed to the bottom to give an additional detail in the front. I didn’t like how it would look with my new fabric, so I removed it.

Step 4 - Re-padding the chair

4) Since I’m recovering the chair in a linen fabric (which is only good for a chair you won’t be using daily- linen won’t hold up as well as regular upholstery fabric), and because stuffing has a tendency to work its way through fabric, I covered the chair with a light cotton padding. As you can see I only did half of the chair at a time so I could see how the other half went together.

Step 5 - Measure many times, cut once

5) Here is a fabric test, but you can see the padding pieces cut to size on the left side of the chair. Because I’m using a rather thin fabric to recover the chair, I stapled the padding down as I covered it with the fabric. Usually the padding would be stapled down and then covered with the fabric.

Step 6 - Refinish show wood (legs in this case) and start re-covering

 6) Using the under-cushion section as a pattern, I cut it out and sewed it into shape. Here it’s positioned on the chair and ready to be sewn into place using a curved needle. You may notice that the legs are now a different color. I sanded and restained them using a black stain & poly combination. Make sure to do this before you start adding your brand new fabric, or you might ruin your nice new fabric.

Step 7 - Arms & back of chair

 7) The under-cushion section is in place and the arms and back are being stapled into place. Remember to hold the fabric tightly when stapling, and keep steady pressure so that there aren’t weird bulges in the fabric. To save on fabric, sew scrap pieces to the sides and bottom of the back to use to hold it in place. Don’t worry too much if it doesn’t turn out perfectly- all upholstery has some minor flaws (even pros).

Step 8 - Rounding the legs

  8) This section is a tricky part- going around the legs. For this, cut the fabric until it almost reaches the joint between the chair and leg. Fold the fabric under at the leg and hold it tight as it passes over the leg. Staple the fabric on either side of the leg, leaving the actual leg part held in place by the tension of the fabric.


Step 9 - Starting on the wings (curves, the upholsterer's challenge)

 9) Working on the ‘wings’ of the wing chair. This was the hardest part for me because of the curves.

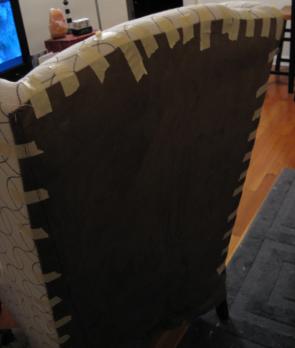
Step 10 - The other side of the wings

 10) This is a change from the original chair – I decided to stitch the outside of the wing into place, because the original metal pieces that held on the outside were damaged beyond repair when I took the chair apart. Using masking tape, I held the pieces in place and sewed them with a curved needle. Because I wasn’t using piping on the wing sections, I think it turned out pretty nice.

Step 11- The back (almost there now!)

11) For the back, I decided to use the same (cheaper) fabric that I used for the piping. Since no one’s really going to see it, I didn’t want to use my expensive linen. The top was stitched in place, and the nail strips (metal pieces with nails sticking out of them) were hammered into place to hold on the sides. To do this, fold the fabric into a thick edge and stick the nails through the fabric. Hammer the fabric (and nails) into place. At this point the bottom of the back can be nailed into place and the dust barrier stapled onto the bottom of the chair.


Step 12- The cushion fabric testing

 12) For the cushion, basically use the original as a pattern and re-create it. Here I’m doing some pattern tests to make sure the pattern matches. As you can see, the fronts of the arm rests have been reattached- usually they will have nails sticking out the back that can be hammered into the arms.

Step 13 - Admire your work (and collapse into it)
13) Sit in your chair and relax!
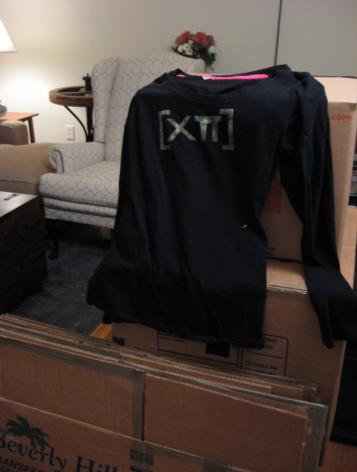

[xπ]

Sunday, February 17, 2013

How to Make a South-African Style Beaded Animal (Platypus Edition)


Tools/Supplies

-         Medium-thickness wire (~20 gauge)
-         Floral wire (30 gauge)
-         Wire cutters/Pliers
-         Seed beads
-         Optional: 2 buttons (for eyes)

Time Commitment

 ~4-5 hours for an approx. 6” long platypus

How to Make it Happen:


Step 1 - Wire up a skeleton

1) Use the medium-thickness wire to make an outline of the animal shape (these instructions are for a platypus). Using pliers (or a Leatherman) makes working with the wire easier, but remember that wire ends will be sharp!


Step 2 - More wire action


2) There will be a total of four floral wire pieces used to make the animal – one wire will wrap around each of the outline wires, and the last one will be used to string the beads. Cut the outline wires about 2 times longer than the length of the outline.Wrap the wires for the outlines around the wires (about 2-3 times to hold them in place). Next, cut a long piece (~5 feet long) for the bead wire. Wrap this wire a few times around one of the outline wires.

Step 3 - Beads and Eyes

 3) Now, string a few beads on the bead wire. Choose a direction to wrap the wire around the outline form (you can’t change your mind on this one) and stick with it. Every time you cross an outline wire, wrap the thin outline wire around the thick outline wire and the bead wire. The thin outline wires will hold the bead wire to the form, so you don’t need to wrap the bead wire around any of the thick outline wires. After you get about half of the head covered, it’s time to add the eyes. Use small pieces of wire to attach buttons around the bead wire. The pliers will come in handy to grab the wires.

Step 4 - Making legs the easy way

4) Since beading the legs would be extremely difficult, take long pieces of wire and wrap them around the legs. Wrap the wire around the outline wire a few times to keep it in place.

Step 5 - The body is done!
 5) If you need to change bead wire while working on the animal, simply wrap the end of the current bead wire a few times around the thick outline wire. Start a new bead wire by wrapping one end a few times around the same thick outline wire you ended on, and continue beading. At the end of the animal, wrap the thin outline and bead wires a few times around the back legs and trim flush. The picture shows new thin outline wires that will be used for beading the tail.

Step 6 - Bead some more

 6) Bead the tail the same way as the body.

Step 7 - Almost there

 7) Since the beak is basically straight across at the front (instead of tapering like the body and tail), wrap the thin outline wire across the front before beading in the same fashion as the tail.

Step 8 - Your new indestructible (more or less) platypus!

8) Wrap and trim the wires, and your platypus is done!


[xπ]

Sunday, February 10, 2013

Whoopie Pie Recipe - Chocolate-Chocolate Chip w/ Peanut Butter Frosting


Whoopie pies are the best of Lancaster County baking : D

Makes approx. 2 dozen whoopie pies

Ingredients:

Whoopie pie
-         1/2 cup butter
-         1/2 cup packed dark brown sugar
-         1/2 cup sugar
-         2 eggs
-         2 tsp vanilla
-         2 Tbsp unsulfured molasses
-         2/3 cup milk
-         1/3 cup unsweetened cocoa (special dark if you can find it)
-         2 1/3 cup flour
-         1/2 tsp salt
-         1 1/2 tsp baking soda
-         6 oz milk chocolate chips

Frosting
-         1/2 cup creamy peanut butter
-         2 cups powdered sugar
-         1/4 cup butter (softened)
-         1 1/2 tsp vanilla
-         pinch of salt (approx. 1/8 tsp depending on taste)
-         approx. 1/4 cup milk (this can vary depending on desired thickness of frosting)

Time Commitment:
 ~2 hours (including baking and assembly time)

How to Make it Happen:

Whoopie pies
  1. Preheat oven to 350 deg F.
  2. Cream butter until fluffy.
  3. Add sugars and mix.
  4. Add eggs, vanilla, and molasses, stirring between each addition.
  5. Mix flour, cocoa, salt, and baking soda separately. Add to butter mixture in parts, alternating with milk.
  6. Beat 1-2 minutes until smooth, then add chocolate chips and mix to incorporate.
  7. Drop by Tablespoons onto a lightly greased baking sheet. Bake 10-15 minutes.
  8. Allow whoopie pies to cool completely before assembling. To keep yourself from eating them, make some frosting!

Frosting
  1. Cream butter and peanut butter together until fluffy.
  2. Add powdered sugar, vanilla, and salt. Mix until thoroughly combined.
  3. Add milk in small portions, mixing in-between additions, until frosting reaches desired thickness. I prefer frosting that’s thicker, just because it holds the whoopie pie together better. If you overshoot the mark (and it gets too watery), add dashes of powdered sugar to bring it back.
  4. Assemble whoopie pies by spreading a large dollop of frosting on one cookie, then sandwiching it with another.
  5. Enjoy! The peanut butter frosting will taste slightly salty the first day, but if stored overnight the salty taste will blend in with the peanut butter. These can be stored in an airtight container in the refrigerator for about 5 days.

Portable and delicious!
 
Note: This recipe is a whoopie pie adaptation of “Quick After-Battle Chocolate Cake” which was published by Patricia C. Wrede in Book of Enchantments. The original is also delicious and her books are fun reading!

[xπ]

Monday, February 4, 2013

Poll for Beaded Animal Project

So I have a 3D beaded animal project coming up, and I haven't chosen an animal yet...

I have it narrowed down to these three:

- Owl
- Platypus
- Lizard

Please let me know your vote either by commenting below or emailing me at jetreese (at) gmail (dot) com.
Anyone who votes by 3/11/13 (next Monday) will have a chance to win the little guy, and I will ship it to you!


[xπ]

Sunday, February 3, 2013

How to Make a Button Wreath


Tools/Supplies

-         Wire wreath form
-         Wire (Florist wire/ 30 guage)
-         Wire cutters
-         Mesh Fabric (enough to cover wreath form)
-         Needle and thread
-         Buttons (depending on button & wreath size – for a 10” wreath, assume about 250 of varying sizes)
-         Felt

Optional:
-         Ribbon (for edging and hanging)
-         Gloves (for twisting wires)

Time Commitment:

 ~ 12-14 hours total (I did this project over the course of a week – it’s better to watch a movie or tv while you’re working)


I’ve seen other tutorials for button wreaths that hot glue the buttons to the form- I’m using antique buttons (some from my grandma’s collection, and some from an antique store), so I didn’t want to ruin them with glue. By wiring them to the wreath, the wreath can be used outside (if it’s sheltered from rain & snow) and the buttons won’t fall off.

How to Make it Happen:

Step 1 - Setup
 
1) This is a combination of steps- First, prepare your wreath form by stretching the mesh over the form. Wire it tightly to the form on the inside and outside edge as you can see in the picture. This is the base for your wreath. Trim the mesh from the inside and outside of the form, leaving a small hem.

Cut small lengths of wire (3-4 inches long) and bend them in half. Thread them through the buttons, leaving small tails on the back. Insert the wires through the mesh and twist tightly on the back of the wreath.

Step 2 - Repeat (Over and Over...)
 
2) Repeat this until you cover the wreath form. Start with the larger buttons and fill in with smaller ones.

Step 3 - Add Edging

3) The rest of the tutorial is using the 10” wreath form – it used a red mesh base (Steps 1 and 2 are with a black mesh). After the wreath is covered with buttons, stitch a strip of felt or ribbon onto the inner and outer edges. Use a simple (up and down) stitch with thread that matches the edging and sew through the mesh, making sure the wire edge doesn’t show. You may have to push the edging under buttons which overlap the edge.

Step 4 - Time for Backing
                                                                                        
4) This wreath has a red ribbon edging. Before putting on the backing, push the edging toward the front of the wreath (after gluing the backing, you’ll fold the ribbon over the backing)

Step 5 - Glue inner edge

5) Glue the inner edge of the wreath first.

Step 6 - Adding filling and gluing outer edge
 
6) Cut small pieces of leftover felt and use them to cover the wires on the back of the wreath (this will keep the wires from poking through the backing). After the wires are covered with the felt pieces, glue the outer edge of the backing.

Step 7 - Finishing the edges
 
7) Trim the backing and fold & glue the edging back over the raw edges.

Step 8 - Cutting the slit for the hanging ribbon

8) Choose the top of the wreath and cut a slit in the backing to insert the hanging ribbon. Make sure the slits are about an inch apart so that the ribbon won’t tear out of the felt (the wreath will be quite heavy because of all the buttons)

Step 9 - Add the ribbon

9) Insert a 5-6 inch piece of ribbon through the slit and tie a knot.

Step 10 - Finishing the wreath!


10) Push the knot under the backing.

Step 11 - Ready for hanging


11) Your wreath is done! This wreath was done with pink, silver, white, and gold buttons, but wreaths made with different colors can be made for different looks (random, stripes, dots of contrasting colors..)

[xπ]